Categories
215806

Introducing Progressive WordPress: Commit Log – Supercharged

What I’m going to do is I’m going to show you how I did my most recent project, which is a PWA that uses WordPress in the back ends. 28 % of domains actually use WordPress and that’s a pretty impressive number, but also WordPress is written in PHP, which you’ve never done on supercharged before, and I know PHP has a pretty bad reputation, but I would like to ask you to not like complain about it In the comments, because I think at around 80 % of backends use PHP, so it’s probably good to have some experience with PHP.

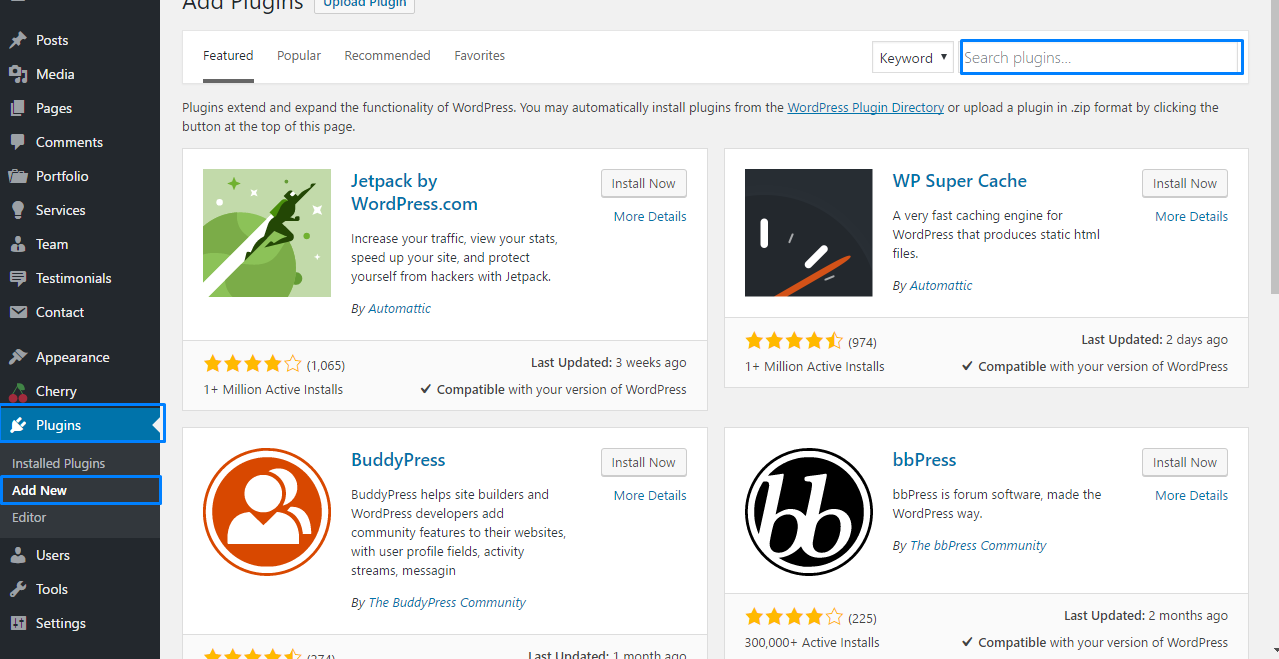
If you are a web developer with WordPress, you usually have two ways to get into the system. You can either write a plugin or you can write a theme if you want to introduce PWA features on a simple way. It is much easier to write a theme and that’s what I did. I just want a theme that uses serviceworker and you know progressive image. Loading all these little things, and I would like to show you how I did that before we start.

I just want to give one warning that I basically have no experience with WordPress, which is kind of good, because on the one hand, that means that I didn’t go into the WordPress internals and did any kind of monkey patching, but also it might mean that I Have violated some wordpress best practices along the way, and I hope you can forgive me for that. But if you find anything that I could have done better feel free to leave a comment or open a PR on the repository.

The link to which I will put in description, so you can check out the code and maybe even run it yourself, but without further ado. Let’s take a look at what I built and where we’re going to arrive, hopefully at the end of the series. So here I have my Moto G 4, which is my development device. The Moto G 4 is what we consider a low end device. It’s not really powerful, but I use it because I want to make sure that all the animations and the loading I did worked smoothly on emoji 4.

So if I open what I add to homescreen here, that is the block it loads really quickly and it’s right there and then we can scroll along and see that every blog post has a button to make it available for offline reading, which I think is a Really nice feature for a blog, and if I open one of the blog post, you will see this really nice transition happening, which makes it feel really slick, and you can just read through the blog post, the images will load in once they scroll into view in Order ahead of time – which again, I think is a really data saving feature and more blocks should have it at the bottom.

You have a comment section where you can also leave a comment yourself and you can even leave comments while offline, which is also a pretty interesting feature, if you think about being in a tube and leaving a comment. But as you can see, even if I go back, there’s transitions it’s happening and they look really nice, and so I pay enough attention to smooth animations, really good loading performance and just a nice user experience.

So I hope you’re excited about this. I certainly am in the next episode I’m going to set up the development environment and I use docker for that which was a really interesting and, in the end, a really good experience. So if you’re interested in that stay tuned, subscribe to the blog and I’ll see you next time, you


Categories
215806

Critical CSS loading for WordPress: Commit Log – Supercharged

Php in our singular PHP to render our blog post listings, as well as our individual blog posts. The next step is to implement the design that I had in mind. I’r not going to talk about that too much you’re welcome to go to the repository and take a look at the CSS files. There shouldn’t be any surprises here: it’s just CSS, it’s mostly just flexbox and some colors, but all right you want to talk about is what happens when I put our phone on a 3G network and see how loading is performing.

3G network basically means low bandwidth high around ten trips and occasional packet loss. So let’s take a look at how the block behaves, so I have removed the block entirely from the phone kill. All the cache misses it’s as if this phone has never visited the block, and so, if I now reload the block, you can see that pretty much in one two seconds: the block is there, the content is there, it’s still pretty room enter a like off.

Styles. Are missing but the user could start reading after about 10 seconds, you can see the embellishments are there, the header logo has completed and the block seems like it’s done loading over a 3G network. The interesting thing here is that, in the background, the loading is actually continuing right now and will continue to do so for the next 40 or 50 seconds. But that doesn’t matter because for the user it seems complete, they’re done loading and they can just start interacting with the page and that’s exactly what I want to talk about this time.

I want to talk about how we can structure your CSS, so it loads efficiently, while still giving you all the creative flexibility that you need. I’ve adopted a fairly simple technique here and so for every component that I have on the page, and the component is something like a header or footer or an article. I have two CSS files, and one of them is full of critical Styles and the other file is what I call the lazy Stahl’s to explain this a bit more.

Let’s look at an example as an example, let’s look at the styles for an article. If you look at the critical cells, you will find only things that are concerned about layout and color and visual space allocation, nothing about box, shadows or images or fonts. All these embellishments are in the Lazy styles. The reason I want to allocate the space for the element as soon as possible is that when the Lazy styles eventually come in, I don’t want to start things jumping around on the screen.

We’ve all seen it on some website where you start reading and suddenly things shift to the bottom and that’s just annoying. So I definitely didn’t want that to happen. So all my critical styles make sure that the layout is there and that an element allocates as much space as it will need throughout this lifetime. But here’s the twist the critical styles are actually in line. So if we take a look at the header.

Php, we can see that I use include to basically read the file and put it into the HTML file itself. That might not be very WordPress II. So I apologize if any wordpress developer is offended by this approach, but it works. So it’s kind of good enough. I guess, but the interesting thing is that even if the user only gets index.Php and all the other requests for lazy styles and whatnot take forever to to arrive, the page is still useful to the user.

They can start reading my blog post and that’s exactly what I want. We can actually emulate this doing with dev tools by using request blogging, so I will block all requests for JavaScript and force tiles, so that means only the index.Php will come through and if I do this and read up the page, you can see that immediately the Con is there, nothing else happens, and I mean sure it’s kind of it’s a great experience.

It’s not as stylish as I would like it to be, but the functionality of the blog of reading my content still works. I can actually still even click links. There’s not going to be a nice transition, but it still works and that’s what I think is really important to take away here. So this is my core technique to get on screen as fast as possible, in line everything that you need for a first content. Full pains and lazy load everything else.

If you do this and put everything that you need to render in your first response for your index.Html, whatever your landing page is, you will smash the time to first content, full panes metric. Let’s talk about the lazy styles. If you look a bit further down in my header PHP, you can see that I put all the lazy styles in a no script tag. This is a little trick. I’ve been using for a while now and I wrote a piece of JavaScript that waits until the page is fully loaded and then looks for no script: tags that have the lazy load class on them and then it rips out all the children and append them to The head, basically at that point, triggering the load of the lazy styles.

The interesting bit here is that if the user has, for some reason, javascript is abled or it’s not working – that the no script tag will just enable these children by itself, because that’s the purpose of the no script tag and it will load these styles right away. Loading styles by default is a blocking processor. That means, if you don’t have Jasmine enabled you will still get the full experience in terms of style, but it won’t load as efficiently.

But if you have jobs been able, my own loading pipeline will kick in and will load the page much more efficiently, which is basically the trade-off that I’m choosing here. It’s probably worth noting that, instead of in lining my critical starts, I could have also used HTTP to push to push these resources down to the clients. But after reading Jake’s are to get a link to the description. I was kind of worried that it’s way too hard to get push rights and worried about browser compliance and pushing things that I don’t really need because they’re already in the cache, so I was choosing to make a trade-off between compatibility and caching efficiency.

Speaking off. That’s exactly we’re going to talk about in the next episode. Caching, headers, something that’s very important to me. It allows you to conserve a lot of bandwidth by only downloading things that are not already in the cache and even something that can be applied to dynamic content.